Thrifty Thursdays: Garage Find!

As you all know by now from my two previous post, Thrift Shopping on a Rainy Day & Home Office Sneak Peek, I am currently working on my Home Office.

Imagine my excitement when I saw this chair in my mom's garage!

Granted it needs alot of work but after a few coats of paint and new fabric I'm sure it'll be gorg! I love the shape of the chair and I think it'll be a perfect chair to go with my desk!

So now I'm trying to decide if I want a bright or subtle color for the fabric... and speaking of fabrics ...should I do solid or printed?!

...and paint color? Black to match with everything else or something random??

Decisions Decisions!!

Suggestions anyone?!?

Alaya


Rooms: Home Office Sneak Peek!

Well decorating, DIY'n, and planning is in progress for my Home Office. As I mentioned in my previous post, I will be working on my Home Office and Rhyan's Big Girl room over the next couple of months.

Here's a sneak peak of some things I have in mind for my office!


1. What's a Home Office without storage? I want storage baskets everywhere!!
2. I love this print! This print + my cheap rug will be cute!
3. Cheap rug I found to bring another color into this black and white office. 
4. In love with this print as well (Look out for this print in future post!)
5. Simple & Functional desk!
6. Love this cozy sofa bed!

Stay tuned for more updates on my home office!

See ya soon!

Laya

Merry Christmas!!


I truly enjoyed Christmas and could not have asked for a better family to spend the holiday with! I hope that you all also enjoyed Christmas!

My daughter absolutely loved all of her Barbie toys, in addition to the ones I told you about in my Christmas Deals Post earlier this week!

Also, my family really like my Menu Board and Holiday Centerpiece! ....which I was very happy about since it was my first time truly getting into the Christmas decorating spirt. Although I was being very last minute, everything came together very nicely!

It's so easy to get wrapped up in the gifts and decorations that we forget to take the time to think about true meaning of Christmas.... Jesus! (I am guilty) Please take time to reflect on the many blessings He has provided you with this year as I do the same!

See ya soon!

Laya


DIY: Holiday Table Centerpiece

Merry Christmas Eve!

Tomorrow I will be hosting our annual Christmas breakfast with our parents. It's our yearly tradition to have breakfast together...going on three years now.  If you are anything like me you want everything to be perfect! ..and if you're anything more like me you've wait until the last minute to pull everything together.

I think the food will be pretty easy.. I mean how hard is breakfast! The food will be great but I wanted to add some Christmasy touches. The first idea that popped into my head was to do a centerpiece. So I gathered up some things I had laying around the house and that I found in my mom's yard and my yard and this is what I came up with.


If you are interested in recreating this here's what you'll need:

DIY: Homemade Menu Board

Christmas is right around the corner and I'm sure many of you will be hosting your family and friends for Christmas breakfast, brunch, or dinner.

Why not display a cute menu board to let your family and friends know what's on the menu!


To recreate this Cute Homemade Menu Board grab the following items:

1. 12x12 Scrapbook Paper
2. 12x12 Quick Frame
3. Pencil
4. Scissors
5. Black Sharpie Marker
6. Straight Edge (Ruler and anything with straightedge)

Here's what to do:
1.   Remove black cardboard from picture frame and line up with scrapbook paper to cut and remove excess paper. (although the scrapbook paper was the same size as the frame I found it was a little bigger than what would fit in the actual frame so I trimmed off the excess)


2. Use straight edge to make lines on scrapbook paper (you can skip this step if you are able to write in a straight line....I unfortunately cant!)


3. Use Black Sharpie to write your menu. If helpful, write it out first in pencil and then trace over it with the Sharpie.


4. Erase visible pencil marks from scrapbook paper


5. Add Scrapbook paper to frame and replace frame glass.


You can use this idea to write whatever you want. I chose a menu since I'll be hosting Christmas Breakfast in a few days. Great thing about this project you can always buy new scrap book paper to change up what you want to display. The scrap book paper here was only $.59! Total cost of this project: $6.00 (Cost of Frame and Scrapbook paper, the other items I already had)

Try this project and let me know how it turns out!

Project Update: I wanted another menu board so I went back to hobby lobby and got the supplies. I caught the 50% deals for everything so the menu only cost me $3.00! (12-9-2015)

Previous Project:

I Heart Christmas Shopping Deals!

Who's all out doing some Christmas shopping today??

I've pretty much finished my Christmas shopping already. This year we vowed not to get our daughter any more toys...the girl has everything! Then randomly she developed a Barbie obsession! She wants Barbie everything! So I broke my rule of  "no more toys" and set out to get her some Barbie toys....most of which I got from Target.


Last night I was out with Rhyan picking up some things from Walgreens when we ran across some Barbie toys. Of course she wanted it and I told her maybe she'll get it from Santa for Christmas. (OK I know there's no Santa but we enjoying playing the Santa game with her)

The Barbie toys were only $9.99 a piece so I planned on going back up to Walgreens in the morning and picking them up.

This morning I headed back to Walgreens and I was so happy I waited a day to purchase these toys. 


Thrifty Thursdays: Vintage Table & Modern Chairs


I have always loved the idea of mixing and matching different styles together. I have a little bit of contemporary, modern, traditional and vintage throughout my house. I hate dislike :) matching furniture sets! When I furniture shop I try to find things that just "go" together... but that's another discussion for another day. 


I had been searching for a table to use in my entryway for about a month when I ran across this cute vintage looking table for only $10.10 at Value Village in Douglasville, GA.

Don't mind the painters tape - I was in the middle of painting

$10.10!

I wasn't sure if it would be good for the entryway but I thought I could spare $10.10 if it didn't work.  I brought it home and it didn't quite work for the entry way so I ended up sticking it in a corner.


Happy 1 Year HomeOwnerversary To Us!


Wow! I can't believe it's been a year since we purchased our first house! (Ok so I'm a day early, it was actually Dec 20, but who cares, Im excited!)

I'm so blessed and happy to be able to be a homeowner!

I highly recommend anybody who is on the fence about becoming a homeowner to go ahead and do it! The benefits to being a home owner significantly outweighs the benefits being a renter! (especially in a time like this when homes are selling for rock bottom prices)


How to Reupholster Chairs {Step-by-Step Guide}

A while ago me and Rhyan reupholstered our dining room chairs. At the time alot of people were asking me how hard it was to do and what exactly did I do... and honestly it was VERY EASY!  With my daughter as my little helper I was able to finish this in no time.

So here's our chair before...


Here it is after...

Here's what you'll need:

Thrifting: Shopping on a Rainy Day

I hope all on my ATL readers are staying dry today! I was able to get out and do some shopping before the rain got too heavy.

Over the next couple of months I will be working to update my daughter's room by giving her a "Big Girl Room" and setting up my soon to be Home Office. During my brief shopping trip I was able to find some pieces that I will add my DIY touch to that I think will be a great start to both of these rooms.

Rhyan's Big Girl Room.

Recently, I had been thinking about giving my daughter a "Big Girl Room." I'm thinking of giving her the BIG GIRL feel by upgrading her from the toddler bed to a twin size bed, adding a night stand, a lamp, painting, and some other things I may think of. I was so excited when I ran across this twin size headboard today at Value Village in Douglasville, GA. for $8.98!


Check in later to see this how I DIY this headboard!
 

I plan on painting it white and adding some girly touches to it.

My Home Office

I do alot of work at home whether it be school work, work-work, or blog work... I really need my own space to just WORK. My current room space is pretty much a catch all room with a bookcase..it's hardly a Home Office...  Today I found this $30.00 rug at Garden Ridge that I plan on adding a chevron pattern to (a great way to save money). 


Check in later to see how I DIY this rug!
 
I've been trying to settle on a color scheme for this room and finding this rug has helped! So I think I'm going to go with Black, White, and this Blue-Grayish color from the rug.

I am so excited about getting these two rooms together and I will keep you all updated on my progess.

Laya

DIY: How To Make Cute & Easy Wall Art!

DIY Wall Art

Ok...this was a project I did about 4 months ago, but thought I'd share as  MY FIRST OFFICIAL DIY PROJECT POST. 

DIY Wall Art 
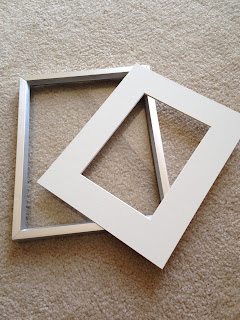
I had some silver picture frames lying around in my closet that I wasn't doing much with. I purchased them about 3 year ago from the Dollar Store for about $2.00 a piece.

As you can see...they were pretty boring!

I saw someone on TV spray painting leaf patterns onto a glass frame. Well..I'm not that artistic so here was my idea of recreating the idea.

DIY Wall Art
Here's what you'll need:

1. Pictures Frames 
2. Picture Mats 
3. Fake Leaves 
4. Silver Spray Paint 


DIY Wall ArtThe project was pretty simple..

Here's what to do:
1. Spray paint the leaves. I used silver, but you can use any color your choose

2. Wait for leaves to dry. It took about 1.5 hours - depending on how many coats you do

3. Add mats to the picture frame

4. Add spray painted leaves to matted picture frame

5. Replace picture backing

By the way, the total cost of this project was $18.00 for four pictures! That's less than $5.00 for each picture! Pretty cheap huh?

Try this project and let me know how it turns out!

Alaya

Linked to:
We Like to Learn as we go 
View Along the Way 
That DIY Party 
Glittler, Glue, and Paint

Welcome!


Welcome to My DIY Diary!

Here I will share my ideas, successes, and challenges while completing some of my projects.

Most of my projects are completed out of necessity. Maybe a blank wall that needs something or a empty corner that needs to be filled....and most of the times (because I’m so picky) I can't find anything in the store that matches exactly what I want. So what do I do... try to create it on my own.

So far..this has been the story of my DIY project life


I would love to hear your feedback, suggestions, and project ideas!